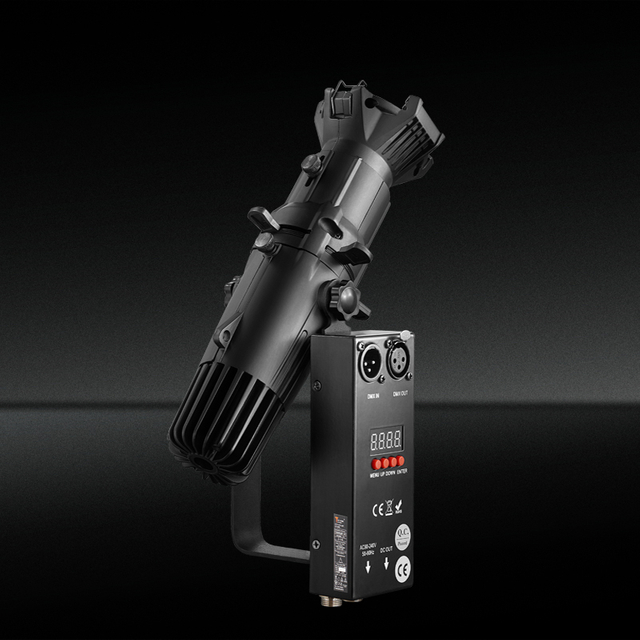
How Does a Mini LED Profile Spotlight Create Precise Beam Control?
Views: 1 Author: Site Editor Publish Time: 2026-08-24 Origin: Site


Controlling light spill in professional environments is a constant battle. When you illuminate a museum artifact, a studio presenter, or an architectural feature, imprecise light degrades visual quality. It pulls viewer focus away from the intended subject. Traditional wash fixtures and legacy halogen units fail here. They generate excessive heat, consume massive amounts of power, and lack the optical mechanics to cleanly isolate subjects in compact spaces.
We need to distinguish a professional Mini LED Profile Spotlight from consumer display technology. "Mini-LED" in televisions refers to microscopic backlight diodes. A profile spotlight is a standalone, precision optical instrument used in stage, studio, and architectural lighting. Understanding the internal optical engineering behind these compact fixtures helps you evaluate new inventory effectively. You can ensure your chosen lighting solutions meet strict photometric and operational demands.
- Optical Precision: High-quality lenses combined with internal framing shutters allow for razor-sharp beam edges and complex shape isolation without light bleed.
- Thermal & Efficiency Gains: Transitioning to LED engines eliminates the extreme heat of traditional tungsten fixtures, protecting sensitive subjects (like artwork or talent) while drastically reducing power draw.
- Evaluation Criteria: Selecting the right fixture requires balancing photometric data (CRI/TLCI, lux at specific distances) against operational constraints (acoustic noise, DMX compatibility, beam angle).
- Implementation Reality: Success depends on matching the fixture’s focal plane capabilities and accessory ecosystem (gobos, irises) to the specific throw distance and application of the installation.
The Mechanics of Precision: How a Profile Spotlight Works
The baseline requirement for any profile fixture is the ability to project a hard-edged, strictly controllable beam over a specific distance without suffering from chromatic aberration or light scatter. Achieving this requires a sophisticated internal architecture that manipulates the light source before it ever leaves the fixture housing. You are not just turning on a light bulb; you are pushing photons through a highly engineered optical pathway.
The Optical Lens System
At the core of beam control is the optical lens train. Unlike basic par cans or wash lights that rely primarily on a simple parabolic reflector, a profile spotlight utilizes a series of plano-convex or aspherical lenses. The primary lens gathers the raw output from the LED emitter and focuses it into a concentrated, narrow pathway. This gathered light then passes through the focal gate before hitting the objective lens at the front of the barrel.
Focal plane adjustment is managed by physically sliding the lens barrel forward or backward. Moving the objective lens changes the focal point of the projected beam. Sliding the barrel to the exact focal point of the internal gate creates a razor-sharp, hard-edged beam. Pulling the barrel slightly out of focus softens the edge, allowing multiple fixtures to blend seamlessly across a wider surface area without visible overlapping lines.
To properly focus a profile fixture in the field, technicians follow a specific sequence:
- Loosen the barrel locking knob located on the top or side of the lens tube.
- Slide the lens tube forward or backward until the edge of the light pool becomes razor sharp against the floor or wall.
- Push in the framing shutters to match the exact shape of your target object.
- Lock the barrel knob tightly to secure the focal plane and prevent gravity from shifting the lens over time.
Framing Shutters and Gobo Integration
The defining feature of a profile spotlight is the internal gate, which houses a four-blade shutter assembly. These metal blades sit directly in the optical path. By pushing, pulling, and angling these individual shutters, operators physically cut the light, shaping the circular beam into precise polygons, squares, or custom asymmetrical shapes. Because the optics invert the image, pushing the top shutter blade down actually cuts the bottom of the projected beam. This inversion takes some practice for new technicians to master while working on a ladder.
Precise shutter cuts maximize subject-to-background contrast. In a gallery setting, shutters can be aligned exactly to the edges of a rectangular painting. The artwork appears to glow from within, while the surrounding wall remains completely dark. This high-contrast isolation draws the viewer's eye directly to the target.
The same focal gate integrates a gobo slot. A gobo is a metal or glass stencil inserted into the fixture to project patterns, logos, or textures. Because the gobo sits at the exact focal point of the lens system, the projected image remains crisp and legible across long distances. In older halogen fixtures, the focal gate would get incredibly hot, often warping cheap metal gobos. Modern LED engines keep the gate cool, allowing for extended use of delicate glass gobos or even high-temperature plastics.
Iris Mechanisms for Diameter Control
While framing shutters create straight lines and geometric shapes, an iris mechanism controls the diameter of the circular beam. A drop-in iris consists of multiple overlapping metal leaves that expand or contract via an external lever. This allows operators to shrink the beam's diameter dynamically to pinpoint a specific detail without altering the fixture's overall intensity or physically moving the unit closer to the subject.
An iris is particularly useful in theatrical spotlighting or product photography where you need a perfect circle of light that is smaller than the fixture's native beam angle. Instead of swapping out the entire lens tube for a narrower degree, you simply drop in the iris and choke the beam down to the exact size required.
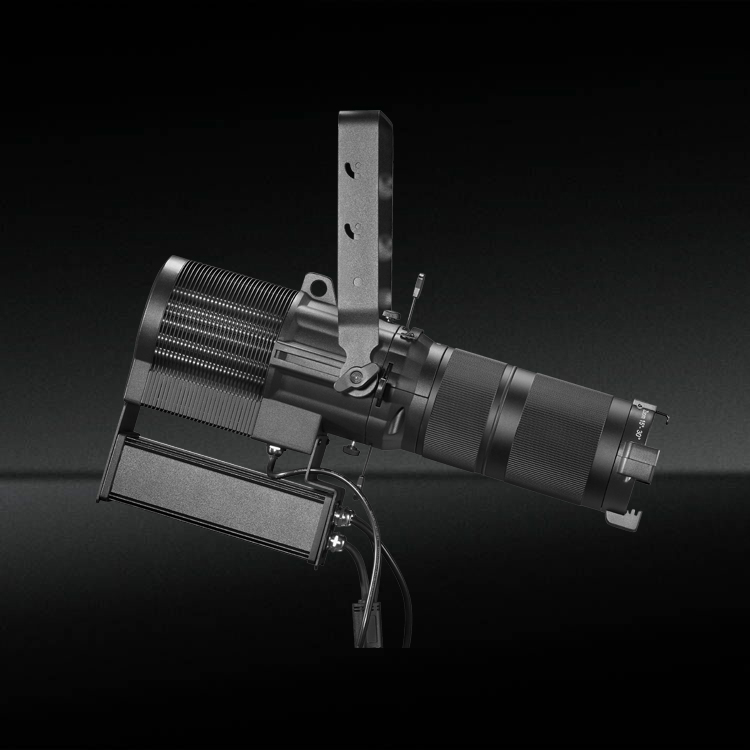
LED Projection Spotlight vs. Traditional Halogen Profiles
The transition from the legacy tungsten-halogen standard to modern solid-state lighting represents a massive operational shift. Evaluating an LED Projection Spotlight against older technology reveals distinct advantages in thermal dynamics, power utilization, and output consistency. We are no longer dealing with fragile filaments and massive dimmer racks.
Thermal Management and Output Consistency
Halogen lamps generate light by heating a tungsten filament until it glows. This process converts the vast majority of its consumed energy into infrared heat rather than visible light. This extreme heat output requires heavy, ventilated housings and poses a direct risk to sensitive subjects. Color gels melt, talent sweats under studio grids, and archival materials in museums degrade rapidly under high thermal loads.
LED engines operate on an entirely different physical principle. They utilize localized thermal management systems like copper heat pipes, aluminum heat sinks, and micro-fans to draw heat away from the diode. The projected beam itself contains virtually no infrared heat. This reduction in ambient heat drastically lowers HVAC cooling loads in enclosed studios and ensures the preservation of delicate historical artifacts in gallery installations. You can place your hand directly in front of the lens of a high-output LED profile and feel almost no heat.
Power Draw and Long-Term Efficiency
The wattage-to-lumen ratio of solid-state lighting heavily outperforms legacy incandescent sources. A traditional halogen profile might require 500 to 750 watts to produce the necessary illuminance for a standard theatrical throw. A modern compact LED equivalent can achieve comparable photometric output drawing only 40 to 80 watts.
Let us look at the electrical math on a standard 120V system. A standard 20-amp circuit provides 2400 watts of available power. If you use 750W halogen fixtures, you can safely plug in three units before tripping the breaker. If you switch to 80W LED profiles, you can daisy-chain up to 30 fixtures on that exact same single circuit. This efficiency allows facilities to run significantly more fixtures without upgrading their electrical panels. It eliminates the need for heavy-duty, dedicated dimmer racks and thick copper cabling. Furthermore, the operational lifespan of an LED engine typically exceeds 50,000 hours, completely removing the recurring maintenance labor and consumable costs associated with replacing blown halogen bulbs every few hundred hours.
Color Rendering and Dimming Curves
Early solid-state lighting struggled with color fidelity. They often produced a green or magenta color shift that looked unnatural on camera or human skin. Modern fixtures prioritize high Color Rendering Index (CRI) and Television Lighting Consistency Index (TLCI) scores, frequently achieving ratings above 95. This ensures that the LED engine matches or exceeds the rich, full-spectrum color fidelity of traditional tungsten.
Dimming performance is equally critical. Halogen lamps naturally dim on a smooth, continuous curve, warming in color temperature as they fade. To replicate this smooth fade-to-black without stepping, flickering, or sudden drop-offs, high-quality LED profiles utilize 16-bit dimming drivers. These advanced drivers provide thousands of individual intensity steps, allowing for imperceptible theatrical fades even at the lowest intensity levels. Additionally, they utilize high Pulse Width Modulation (PWM) frequencies to ensure the light does not flicker when captured by high-speed digital cameras.
Evaluation Dimensions: Choosing the Right Fixture for Your Space
Selecting the appropriate fixture requires a technical framework tailored to the specific demands of the installation environment. A unit that performs flawlessly in a retail display might fail completely on a broadcast television set. You have to match the hardware to the room.
Application-Specific Matching: Video Production, Photography, and Stage
Different disciplines prioritize different optical and electronic characteristics. You cannot buy a one-size-fits-all fixture.
- Video Production: Broadcast and film environments demand flicker-free LED drivers. Cameras shooting at high frame rates or specific shutter angles will capture banding or flickering if the LED's PWM frequency is too low. Look for fixtures with adjustable PWM rates up to 25,000 Hz. Additionally, video sets require focused narrow beams for precise hair lights or background accents that will not spill into the camera lens and cause flaring.
- Product Photography: Macro and tabletop photography rely heavily on razor-sharp gobos and micro-framing. The ability to cut light exactly at the edge of a product prevents light from washing out seamless paper backdrops, maintaining deep shadows and high contrast.
- Stage & Performance: Theatrical applications require clean, focused beams to isolate individual performers. High-intensity punches of light enhance dramatic tension, while the ability to drop in textured gobos creates dynamic stage environments without illuminating unwanted rigging or set pieces.
Beam Angle and Throw Distance Requirements
The physical distance from the mounting point to the subject dictates the required beam angle. Using a fixture with an incorrect beam spread results in either a massive, uncontrolled wash of light or a tiny, unusable pinpoint.
Photometric charts provided by manufacturers detail the beam diameter and illuminance at specific distances. A narrow 19° fixed lens is designed for long throws, such as lighting a stage from a front-of-house catwalk. A wider 36° or 50° lens is suited for short throws, like illuminating a museum display case from a low track ceiling. Zoom profiles offer adjustable beam angles within a specific range, providing flexibility for multi-use spaces at the cost of slightly reduced optical efficiency.
Color Temperature Configuration Comparison
| Configuration Type | Primary Benefit | Ideal Application | Lumen Output Impact |
|---|---|---|---|
| Single CCT (Fixed) | Maximum brightness and efficiency | Galleries, retail, fixed studio setups | Highest overall output per watt |
| Bi-Color (Tunable) | Matches ambient daylight or tungsten | Interviews, location video production | Slight reduction at extreme ends |
| RGBW / Full Color | Infinite color mixing without gels | Theatrical stage, architectural effects | Lower white-light output than Single CCT |
Control Protocols and Integration
Integration into existing infrastructure dictates how the fixture receives commands. Studio and stage environments rely on DMX512 networks. Fixtures must feature robust DMX implementation, allowing lighting consoles to control intensity, color, and sometimes motorized zoom. Remote Device Management (RDM) is highly recommended. RDM allows technicians to change DMX addresses and monitor fixture temperatures remotely from the console without climbing a ladder.
For standalone architectural or gallery use, secondary control options are necessary. Local dimming knobs on the back of the fixture allow curators to set levels manually. Bluetooth connectivity or proprietary mobile apps offer wireless configuration for installations where running DMX data cables is structurally impossible.
Build Quality and Acoustic Noise
Thermal management dictates acoustic performance. High-output LED engines require cooling, but fan noise ruins audio recordings in broadcast studios, video production sets, and quiet gallery environments.
Evaluating acoustic ratings is mandatory. Fanless, passive cooling designs rely entirely on large metal heat sinks. They are completely silent but generally have lower maximum brightness to prevent overheating. Active cooling systems use fans to push higher lumen outputs. Premium fixtures utilize intelligent, temperature-controlled micro-fans that only engage when necessary. Many also feature silent modes that cap the maximum light output to keep the fan from spinning up during quiet acoustic performances.
Implementation Realities and Adoption Risks
Procuring the right fixture is only the first step. Installation introduces physical and electrical risks that can derail a project if not mitigated during the specification phase. You have to plan for the physical reality of the building.
Rigging and Weight Constraints in Compact Spaces
Mini profiles are frequently deployed on track lighting systems, drop ceilings, or lightweight pipe grids where traditional heavy fixtures cannot fit. However, the physical footprint and weight still matter.
Verify track adapter compatibility before bulk purchasing. A fixture designed for a 3-circuit global track will not mount to a single-circuit residential track. Furthermore, calculate the structural load limits of the mounting point. While LED fixtures are lighter than halogen units, clustering several units on a suspended ceiling grid requires proper safety cables and weight distribution. Always use a rated safety cable wrapped around the primary mounting pipe, bypassing the c-clamp entirely.
Compatibility with Existing Dimming Systems
Connecting modern LED fixtures to legacy phase-cut dimmers is a major risk. Older theaters and architectural spaces often have Silicon-Controlled Rectifier (SCR) racks designed specifically for incandescent loads. Phase-cut dimmers alter the AC voltage waveform. This conflicts with the internal electronic drivers of LED fixtures, resulting in severe flickering, strobing, or permanent hardware damage to the fixture's power supply.
To mitigate this, ensure the facility has relay power modules that provide constant, non-dimmed power to the fixtures. Intensity control must then be routed via data protocols like DALI, 0-10V, or direct DMX. If the fixtures must run on phase-cut tracks, verify that the specific LED model features a specialized mains-dimmable driver explicitly rated for legacy compatibility.
Mitigating Chromatic Aberration at the Beam Edge
Lower-tier optical systems often struggle with light separation. They produce a distinct blue, orange, or rainbow halo at the edge of a hard shutter cut. This chromatic aberration looks unprofessional and distracts from the illuminated subject.
Mitigate this risk by requesting demo units prior to final specification. Test the edge clarity and color separation by projecting a hard shutter cut against a neutral white wall at the intended throw distance. High-quality aspherical lenses will maintain a crisp, color-neutral edge across the entire focal plane.
Conclusion
- Measure your exact throw distances from the mounting pipe to the subject to determine the correct beam angle required.
- Request photometric IES files from the manufacturer and load them into your lighting design software to verify illuminance levels.
- Order a single demo unit to test fan noise, edge clarity, and dimming curves in your actual room before committing to a bulk purchase.
- Verify your facility's electrical infrastructure provides constant relay power rather than legacy phase-cut dimming.
FAQ
Q: What is the difference between a mini LED profile spotlight and a wash light?
A: A profile spotlight utilizes a complex lens system and internal shutters to project a hard-edged, precisely shaped beam of light over a distance. A wash light uses basic reflectors or frosted lenses to produce a soft, wide, diffused output that covers a large area but cannot be sharply focused or cut into geometric shapes.
Q: Is a Mini LED Profile Spotlight the same as Mini-LED TV technology?
A: No. A profile spotlight is a standalone, physical lighting fixture used by professionals for precise beam control in architectural, stage, or studio spaces. Mini-LED display technology refers to microscopic backlight diodes integrated into LCD television screens to improve local dimming and contrast ratios.
Q: Can you use glass and metal gobos in an LED projection spotlight?
A: Yes. Because LED engines produce virtually no infrared heat in the beam path, both metal and delicate glass gobos can be used safely without risk of melting or cracking. The low thermal output even allows for the use of cheaper plastic or printed film gobos in some low-wattage models.
Q: What is the ideal beam angle for product photography and gallery lighting?
A: The ideal angle depends entirely on the throw distance and subject size. Short distances require wider angles like 36° or 50° to cover the artwork. Longer distances require narrow angles like 19° or 26°. You must calculate the beam spread using the manufacturer's photometric data to match your specific room dimensions.
Q: How does an iris differ from framing shutters in a profile light?
A: An iris is a mechanical accessory that shrinks or expands the circular diameter of the beam without changing the light's intensity or moving the fixture. Framing shutters are four individual blades used to cut straight lines into the beam, creating geometric shapes like squares or triangles.
Q: Are mini LED profile spotlights suitable for outdoor architectural use?
A: Suitability depends on the Ingress Protection rating. Most standard studio and gallery units are rated IP20, meaning they are strictly for indoor, dry use. For outdoor architectural illumination, you must specify IP65-rated fixtures, which are sealed against dust and water jets.
Q: What is the expected lifespan of the LED engine in these fixtures?
A: Professional LED engines are typically rated using the L70 standard, meaning they will maintain at least 70% of their original brightness for 50,000 hours or more. This vastly outperforms traditional halogen bulbs, which typically burn out and require replacement every 500 to 2,000 hours.